How do I?

Playback Video
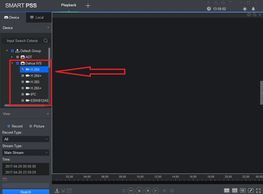
1. From the home menu select "Playback".
2. From the left hand side select device -> camera or cameras. More than one maybe selected.
3. Select Record type. Drop down menu allows to select All Records, General, Alarm, MD (Motion Detection), and Intelligent Analysis.
4. Select Stream Type (Main Stream or Sub Stream).
5. Select Date and time -> Select OK -> Select Search.
6. Click on the Play button.
Download Video
- While in playback, press pause at the beginning of the video you want to download
- Click on the scissors on the lower left corner, near the search bar.
- Press play until you get to the end of the time frame you want to download, press pause again and then the scissors again.
- Change your Path to the folder you want to save to.
- Change Export format to AVI and click OK
Playback USING SOFTWARE
1
1
1

From the home menu select "Playback".
2
1
1
From the left hand side select device -> camera or cameras. More than one maybe selected.
3
1
3

Select Record type. Drop down menu allows to select All Records, General, Alarm, MD (Motion Detection), and Intelligent Analysis.
4
4
3

4. Select Stream Type (Main Stream or Sub Stream).
5
4
5

Select Date and time -> Select OK -> Select Search.
6
4
5

Click on the Play button.
trip external siren using the app
Open the app to Live Video
Manually turn ON & OFF the siren
Manually turn ON & OFF the siren

When in live video, slide the buttons on the bottom of the screen to the left and tap on the triangle icon.
Manually turn ON & OFF the siren
Manually turn ON & OFF the siren
Manually turn ON & OFF the siren

On output 1, sound the siren by tapping on Manual, stop it by tapping Close. If the siren is on a schedule and you want to keep it on the schedule, tap Automatic.
Wire Strobe to alarm output on NVR
1
1
1

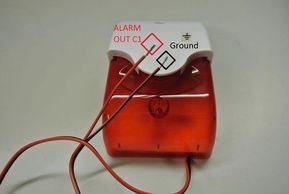
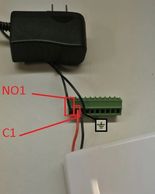
1. Here is your Electronic Buzzer, please read the product guide for this sensor to determine which lead is the power positive (ALARM OUT C1) and which lead is the Negative/Ground ⏚ in the event that the alarm is unidirectional and not bidirectional.
2
1
1
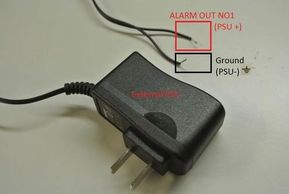
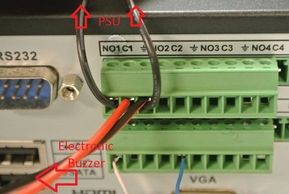
2. Also refer to the power requirements and specifications in order to make sure you are using the proper power supply unit for this device. Also Identify your power supply leads PSU+ and PSU- or Negative/Ground ⏚. PSU+ will go to ALARM OUT NO1.
3
1
3
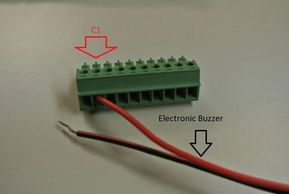
3. Take the Electronic Buzzer and seat the positive lead it into the power block corresponding to ALARM OUT C1
4
3
4. Take the PSU and seat the positive lead it into the power block corresponding to ALARM OUT NO1
5

5. Now seat both the PSU and Electronic Buzzer's Negative/Ground ⏚ leads into any of the corresponding alarm out Negative/Ground ⏚ terminals on the NVR/HCVR/DVR
6

6. Now double check and make sure you have everything setup according to all of your device's (NVR/HCVR/DVR PSU and Electronic Buzzer) specifications. Also check that the leads are seated properly in the power block and are making full metal to metal contact with the power block.
7
7
7
7. Now Connect the power block to the corresponding ALARM OUT area, and plug in your power supply.
8
7
7
8. For testing purposes use this setup on your NVR/HCVR/DVR to make sure your setup works. Main Menu > Event (under settings) > click on Alarm tab > Enable Alarm > Select Alarm Out 1 > Enable Buzzer > click Apply.